Adobe Photoshop Manipulation Without Change Background
 |
| Photoshop Manipulation |
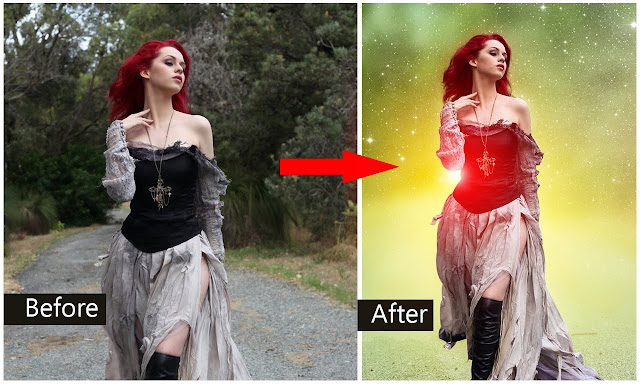
Hi mate, this is Reza from Apple Graphic Studio. In today’s tutorial, I’m gonna to show you how to manipulate an image without changing background. Which will looking amazing.
[Note: I have done this work by utilizing Adobe Photoshop CC 2017. It might be work on Adobe Photoshop cs 6, cs 7, CC 2014, CC 2015 and CC 2017.]
STEP 1
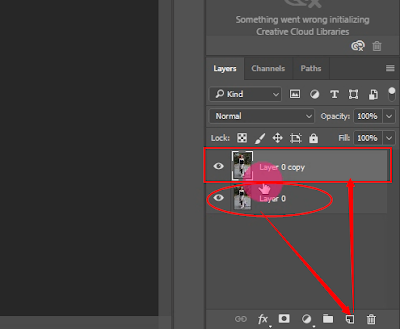
First of all, drug your desired image in Photoshop. Duplicate ‘Layer 0’. See the screenshot below.
Now choose the Pen Tool. And select out the model’s area. After select all area, press Ctrl+Enter from your keyboard.

As usual, go to Refine Edge option. Please keep it in mind that, in Photoshop CC 2017 changed the name of ‘Refine Edge’ option to ‘Mask’. And mask your hair by following the screenshot below.

STEP 2
In this step, select ‘Layer 0 copy’. Click the ‘Mask’ icon like the screenshot below.

STEP 3
Go to Filter > Camera Raw Filter. And Change the temperature in to +9 and also decrease the Tint into -67. After that, click OK.

STEP 4
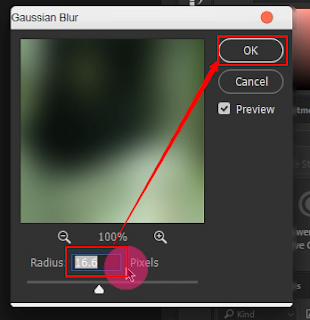
Now back to ‘Layer 0’. Select ‘Layer 0’ from Layer panel from Photoshop. Then go to Filter > Blur > Gaussian Blur.
Set the Radius 16.6. And then click OK.
STEP 4
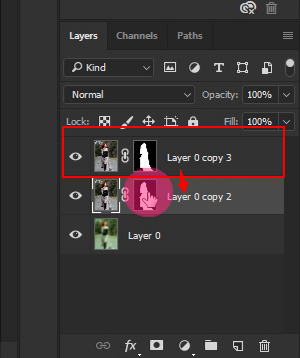
Now Duplicate the ‘Layer 0 copy’ by pressing right button from your mouse.
Click right button from your mouse on ‘Layer 0 copy 2’. You will find “Delete Layer Mask”. Click “Delete Layer Mask” option without thinking anything.
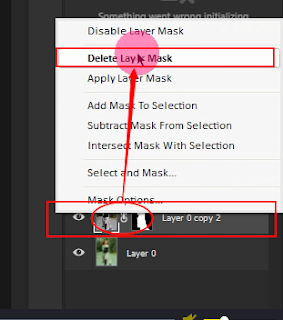
STEP 5
After delete the Layer Mask again click ‘Mask’ icon by selecting ‘Layer 0 copy 2’. Then select the Gradient Tool and click and scroll it up to down. Follow the screenshot below.

STEP 6
Create a new layer above the layer of ‘Layer 0 copy 2’. Dabble click the the layer and rename this into ‘Light’.

Here we will work in 3 mini step.
1. Firstly, Select the layer of ‘Light’ from layer panel.
2. Secondly Select 2 different color by using switcher. One is White and another is Yellow.
3. At last, select brush tool and paint 2 rectangle. One is big Yellow rectangle and another is small White rectangle.
After complete those 3 steps, set this layer’s blending mood into Screen from Normal.
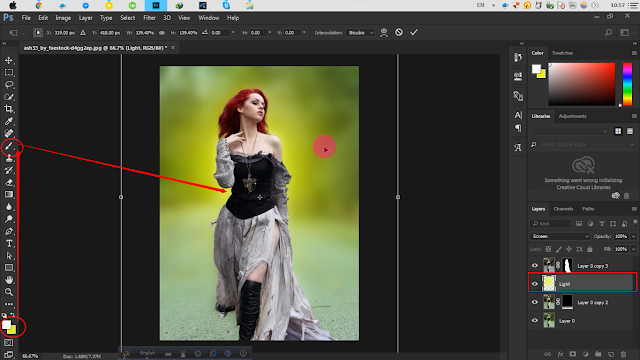
STEP 7
Add the Galaxy stock image under ‘Layer 0 copy 3’. Note that, I have already shared this stock above, in ‘Stock Images’ folder. Press Ctrl+T for transform and adjust the Galaxy image.

Set its blending mood to screen. Look the screenshot below.

STEP 8
Create an another new layer, above all layer. And now go to Image > Apply Image to apply all layers into one.
After that, again go to Filter > Camera Raw Filter and correct the color and lights. And click OK.
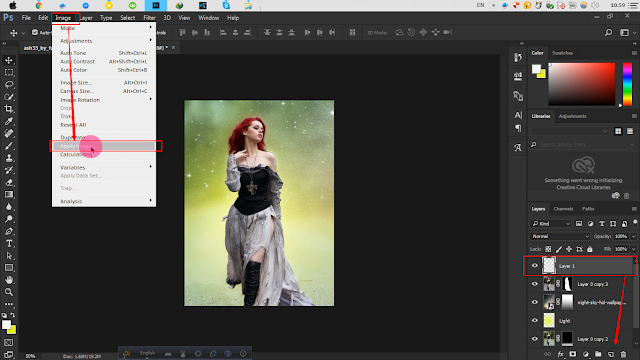
STEP 9
Yeah…. We are now in last step of today’s task. Create a new layer above all layer. Here we will work in 3 mini step like ‘Step 6’ that we passed above.
1. Firstly, Select the layer of ‘Light’ from layer panel.
2. Secondly Select 2 different color by using switcher. One is White and another is Red.
3. At last, select brush tool and paint 2 rectangle. One is big Red rectangle and another is small White rectangle.
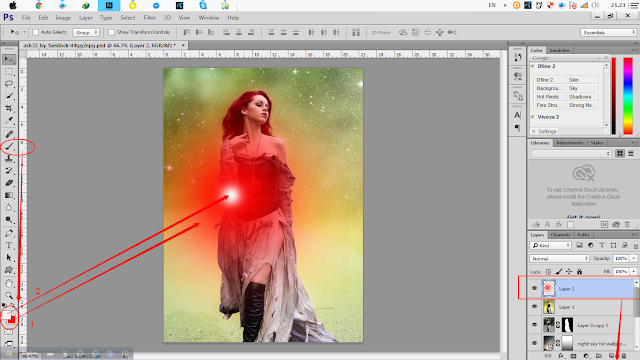
After complete those 3 steps, set this layer’s blending mood into Normal to Screen.

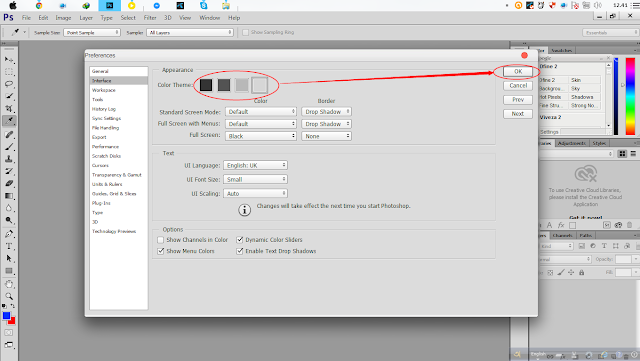
Wow. We have successfully completed our today’s task. He He He… Did you noticed anything? My Photoshop interface color has been changed. Do you want to learn this small tip?
Okay. Go To Edit > Performance > Interface. And select your desired color and set OK. Understand?
Hey guys, I hope you have understand this tutorial properly. If you are not able to understand this text tutorial, so what?
I also have created a video tutorial for you. Check below. And stay with Apple Graphic Studio. Thanks and have a nice day.


